3 Simple ways to Organize your Bras!

They are soft, hard, sore, sag, have various sizes, can change the way the world views us and most importantly provide nourishment.

Can you guess what I'm talking about?

Boobies, breast, tits, knockers, bazookas the list can go on and on are an important part of being a woman. Because we are born with boobs, to slow down the process of sagging and for some of us to help with posture, we have to wear bras.

Fun Fact: When I was 18 years old, I wanted a boob job. For whatever reason I was extremely self-conscious of my breast and wanted them BIGGER. After leaving the consultation, I realized that doing this procedure wasn’t for me at least not yet and didn’t proceed with the procedure.  

For the last 5 years I have gone through numerous of bras. Whether they were from Victoria’s Secret or Target, in the past I’ve found it difficult to preserve my bras. At first, I thought it was because I was washing them the wrong way and I thought it was because they were cheap. After years and years, I finally figured it out that the main culprit was the way I stored my bra. Of course, for your bras to last longer, the way you wash it and the quality of it influences the longevity of your bra but for a long time, I was storing incorrectly.

Time has past now, and I have found a few different ways to organize my bras and it has made such a difference in their endurance.

Today I will show you 4 different ways to organize your bras and I hope you try them and let me if they work for you.

Let’s begin with some ways to get your Bra organization ready!

Tips to Prepare your Bras before Organizing them: 

·       Create some space solely for your bras

·       Color coordinate

·       Line them up

Now, here are ways to organize your Bras:

D R A W E R   D I V I D E R S

drawer divider.jpg

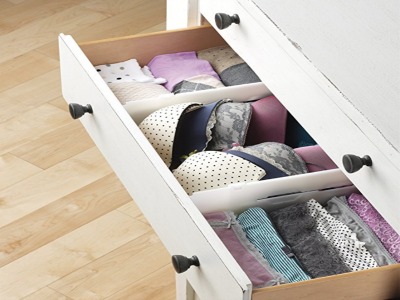
Using drawer dividers provides separation in the drawer allowing your bras to breathe and not be bothered. I used these white drawer dividers and they work great in these drawers. If you decide to go this route, make sure you have the correct measurements of your drawer because the dividers come in various sizes and you want to make sure it will fit your drawer. Using this technique, my bras have their own space and have room for growth.

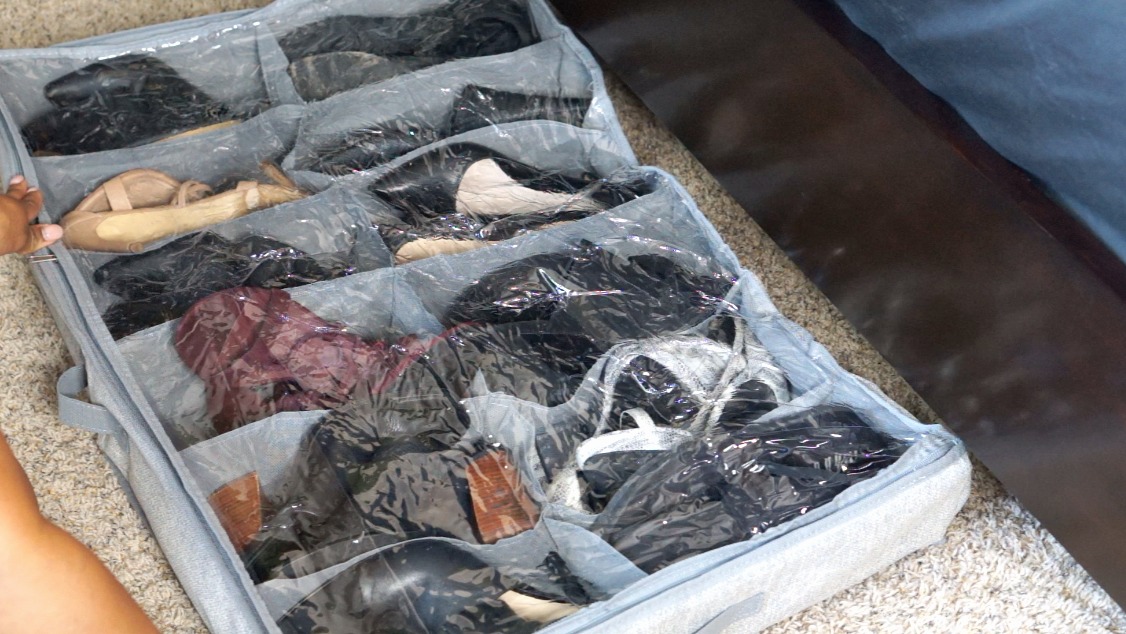
F O L D A B L E   U N D E R W E A R   O R G A N I Z E R

underwear organizer.jpg

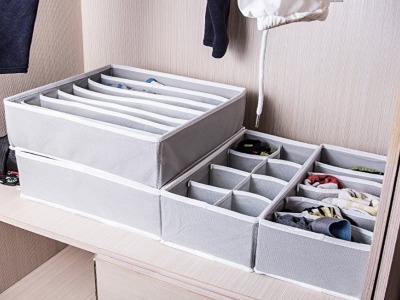
 In the first option you line your bras together while the divider keeps them in place. The only difference is your bras sit inside the organizer and are separates bra by bra. This particular organizer has 7 dividers therefore if you have more than 7 bras you will need more organizers. Just keep in mind your bra size is a C cup and higher, it may be difficult to fit the organizer with your bra inside of them in your drawer (unless you have a deep drawer). In this case, you can store your organizer on any flat surface even under the bed if you lack storage.
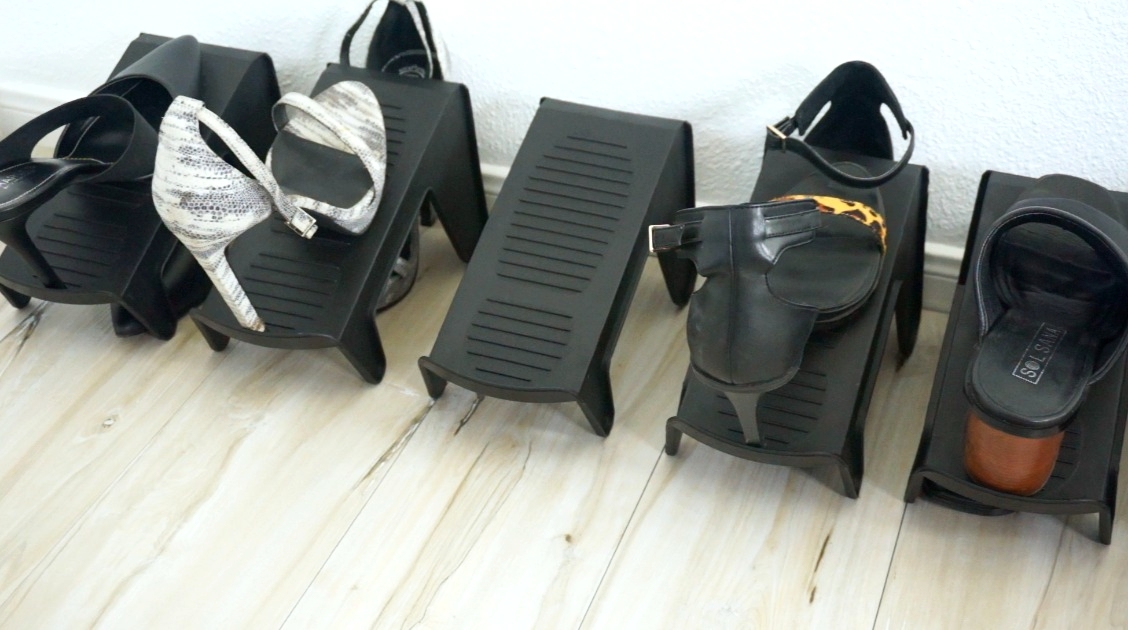
B O O B I E   T R A P

boobie trap.jpg

  First off let's give an applause to the name of this organizer!

[applause]

The name in its self-explains exactly what it does. It traps your bras in place so they won’t move as you open and close your drawer. They are made to specifically preserve the shape of your bra so you’ll never have to worry about them losing its structure. They do fit in most drawers but just be sure again to measure your drawer before buying them because unlike the foldable underwear organizer, this item is not flexible. They are the most expensive out of the 3 mentioned today so if you but they will keep your bras neatly stored upright in the drawer and keep them nice, neat looking beautiful and organized.

I am giving an away one of these bad boy boobie traps so if you’re interested in getting your hands on one of these let me know if the comments below how many siblings you have and where you fit amongst your siblings.

For example, I have 2 other siblings and I am the middle child!

I hope you enjoyed this article and I hope it helps you get your bras more organized.

Until next time!

signature for blog post .png
 

3 Simple ways to Organize your Shoes

Hello Spacers…. Is it sticking yet??? When I was in my early 20’s shoes were my thang. Not thing but thaaaang! I loved everything shoes and if it was on sale, I was buying multiple. There was a time in my life when I owned over 150 pair of shoes at one time. It got so bad I had to house a lot of them in other rooms and honestly at that time I still thought I needed more. Like I said before, it was my thaaang! Anyways after years of evolving and finding love in more meaning things like creating and travel, that love shortly drizzled.

Jumping forward to now, I still love shoes, but I am very selective in the ones I choose. I stick to the 2 out 1 in rule where when 1 pair comes in 2 goes out and I’m so happy with the amount I have now.

As my collection decreased, my love for finding ways to simplify the way they are stored and organized has increased and I’ve found 3 shoe organizers that I use and love to recommend to others.

Below are 3 of my favorite shoe organizers that have transformed the way my shoes are organized. Each image will be clickable if you’re interested in getting them for yourself. I hope this inspires you to get your shoes organized and to live a more organized life. 😊


Shoe Organizer #1: Hanging Shoe Shelves

This organizer neatly stores and organizes 30 pairs of shoes easily. It’s perfect for organizing closets, laundry, playroom and many other spaces in the home. Because this organizer does take up quite a bit of space, it’s ideal for closets or areas that are medium to large size or have extra space. Assembly is quick and once it’s set up in your space, you’ll have no problem keeping your space organized. Gone are the days when your shoes are forced to sit on the floor. Now they can hang in peace and stay organized.

hanging shelves.jpg

Shoe Organizer #2: Under bed Shoe Organizer

If you are lacking storage space, this organizer will help keep your space organized and best of all hidden. Because it has many shelves, you are able to fit a good number of pairs of shoes comfortably. It’s even great for heels! Assembly is quick and simple and most importantly can be stored not just under a number of furniture items. If you’re looking for a simpler and inexpensive method of combating your shoes, this organizer does the job perfectly.

under bed organizer .jpg

Shoe Organizer #3: Shoe Stackers

This shoe organizer is a bit different because rather than storing your shoes in the organizer, you will store your shoes under and on the organizer. The organizer creates more space in tight areas so if you need to add more shoes on a shoe rack or in a shoe cabinet you can easily. Once your stacker is out of the package it’s ready to use which is essential when simplicity is your goal. This particular shoe stacker organizer only comes with 6 stackers but if you have more than 6 pairs of shoes, you will definitely need more. Besides that, this is a great organizer to incorporate into your space if you’re looking to store your shoes in a more efficient and cost efficient way.

shoe stackers.jpg

If you're interested in learning more about different organizing products that are simple to incorporate, assemble and can transform the way your home functions, let me know in the comments section below. 

signature for blog post .png
 

3 Simple Ways to Fold Socks

Screen Shot 2018-05-13 at 9.48.45 PM.png

Hello, Spacers…. Okay, I’m trying to find a good name for y’all and its taking my a while to do so!

I was recently doing laundry which for me is washing, dryer, folding and putting them away. Side note: what does laundry mean to you?

Anyways, I was folding and putting aside laundry and came across the socks. Typically, my normal sock folding process is rolling and tucking the elastic part while the feet portion dangles, which for me has worked for many years and still works but because I’m constantly looking for quicker and more simple ways to folding clothes, I wanted to share with you a few simple ways you can fold your socks especially during those busier times. Best part about these different techniques are when organizing your sock drawer, you will no longer have to worry about it being cluttered.

Sock Technique #1 – Roll & Tuck

Take a pair of socks and lay them on a flat surface

Screen Shot 2018-05-04 at 7.41.36 AM.png

Take one of those socks and place it on the other sock. Take the cuff of the sock on top and fold it 1” in.

Screen Shot 2018-05-04 at 7.42.03 AM.png

Next, roll the toe of both socks up until you get to the cuff. 

Screen Shot 2018-05-04 at 7.42.44 AM.png
Screen Shot 2018-05-04 at 7.43.13 AM.png

Once that’s done tuck in the rolled part and then you’re done.

Screen Shot 2018-05-04 at 7.43.27 AM.png

Sock Technique #2 – KonMari

Take a pair of socks and lay them on a flat surface.

Screen Shot 2018-05-04 at 7.45.00 AM.png

Take one of those socks and place it on the other sock and fold both socks into thirds. 

Screen Shot 2018-05-04 at 7.46.53 AM.png

You know you’ve folded it correctly when the socks stand up without assistance

Screen Shot 2018-05-04 at 7.47.53 AM.png

Sock Technique #3 – The Fold Over

Take a pair of socks and lay them on a flat surface.

Screen Shot 2018-05-04 at 7.48.22 AM.png

Lay one sock over the other forming a cross.

Screen Shot 2018-05-04 at 7.49.23 AM.png

Now take both socks toe and cuff and fold them into the center.

Screen Shot 2018-05-04 at 7.49.11 AM.png
Screen Shot 2018-05-04 at 7.51.32 AM.png

Flip it around then you’re done!

Screen Shot 2018-05-04 at 7.51.45 AM.png

I hope this shed some light on different ways to fold socks and possible add some fun to those dreadful laundry days. Well, until next time! 

signature for blog post .png
 

How to Properly Organize your Mail

shutterstock_683818474.jpg

Trust me, I know. Really, I know! Sorting through your mail is the last task you want to be doing any day of the week. The mere thought of opening and reading each letter already has you looking the other way. Believe me, I understand because that was me.

Organizing my mail was a job I’d put off for weeks on end. My thought was “well if I don’t acknowledge it, it doesn’t exist!” It had gotten so bad I was constantly late paying my bills. I even ended up missing so many important events because of my neglect. I had a problem and I needed to fix it.

After trying different organizing systems and experiencing a number of setbacks, I think I can say that I’ve finally found the best way to organize your mail.

Here it goes!

The best way to organize your mail is…. To go through it as soon as you get it. No more putting your mail into designated bins and no more putting it off until the end of the week on cleaning day.

I’m not at all saying if you’re someone who has found it more efficient to use designated bins is a bad thing because for a lot of people this has really helped them organize their mail. And as long as it works that’s perfect! Just be sure to keep up with your trays to make sure it doesn't overflow because it’s that overflow that prevents you from going through it.

After years of fighting my mail and running away from it, I discovered that there’s no true way I could efficiently organize my mail then by going through it the moment it comes through my door. Using this technique has saved me from missing payments (now everything is automatic) and time.

Let me know in the comments below if you’ve created a mail system in your home that works.

signature for blog post .png
 

6 Ways to Label a Container

Screen Shot 2018-03-15 at 7.08.16 PM.png

There are over 1000s of different types of labels in the current marketplace. Okay, I made this number up but seriously there are a lot of labels out there especially different kinds to place on containers so you can organize your stuff properly. Some are wooden, some use metal to showcase their label, some are re-usable while others just aren’t.

The main purpose of using labels when organizing, is they help grab attention, communicate what is in a particular bin and make it convenient for others to find what they need easily with out wasting time.

Today I will give you 5 ways to label a container using 5 different types of labels. These are my own opinions about these labels and are the ones I use the most in either my client’s homes or in my personal space.

 Label #1: Chalkboard Labels

You'll find dozens of uses for our chalkboard labels. They can be used to organize jars, your kitchen, to decorate a wedding, engagement parties and many more. They come in varies shapes and sizes which makes them the ideal label to use in any space. To personalize these labels using a chalk board marker gives it its tidiness and precise appearance.


Label #2: Clip Label Holders

You can use this metal holder with any container to quickly distinguish the things inside. Simply write on the label and place it in the holder. It clips on to most surfaces quickly and easily.


Label #3: Adhesive Labels

These Adhesive Labels are best used on plastic bins or totes but of course can be used to label and categorize any type of container. They are made from vinyl, they’re self adhesive and come with blank label inserts. These are a new favorite of mine and I’m constantly introducing them to all my clients.


Label #4: Gift Tags

Just write on the gift tag and tie it to your container quickly and easily! It's a great way to keep everything in place without having to look inside. Plus, they can be used to personalize a gift.


Label #5: Label Maker (Labels)

The labels that are created from a DYMO label maker are

Type your text, edit and print for flawless, professional labels each time. This machine makes it easy to label just about anything, anywhere – it’s honestly addictive.


Label #6: Cable Identifiers

Identify cords and wires instantly with these cable identifiers. Flexible enough to fit nearly any cable thick or thin and can be labeled using a pen, pencil, marker or label tape using a maker.


Bonus Label: Printable Labels

FREE PRINTABLE HOME ORG LABELS.jpg
Screen Shot 2018-02-25 at 8.42.32 PM.png

If you’re interested in personalizing your storage systems in your home or even office space I’ve created some minimal labels for you. You can print these out for your own personal organizing projects below. 

CLICK HERE FOR PDF VERSION


signature for blog post .png

Why You’re Unorganized

shutterstock_297886847.jpg

You’ve walked into your closet and realized that the organizing systems you created 3 weeks ago to make your closet organized no longer works. Your skirts are sitting in a pile near the window, your shoes are all scattered throughout your room and that jewelry holder you spent a lot of time putting together no longer has a role in your space.

Your space is Disorganized…AGAIN!

At this very moment you may be yelling a couple of swear words to your stuff thinking that maybe just maybe it will pick its self up and get organize by themselves. You may also be looking on Pinterest or even YouTube to look for ideas on how to better organize your space because everyone else organizes better than you, right?

Let me tell you the truth.

Organizing is more than just a physical thing it’s a mindset. You have to create habits in order to get and maintain an organized space. When you have an organized space without the mental aspect, its all just a façade – it doesn’t really exist. Okay sure everything is in its place and you have all sorts of bins lined up in a crisp row but there’s more to it than just that.

Let me be honest.

My name is Judi and I’m not always organized. There are times I throw my things on the floor and I don’t always put them back in their place. Some times I may even leave an item next to its container. I know. All it takes is for me to move my hand 1 inch to the left and place it inside – but I don’t wanna! Its not until my anxiety takes a hold of me and I spazz out before I re-coup and get organized. I promise you my home isn’t always organized but because of the habits and routines I've implemented in my home, I'm able to get myself together and keep it organized - most of the time :)

So to sum all this up

Organizing is a lifestyle. You have to work at it every single day to form a habit – a lasting habit. It took me a while to finally figure out what worked in my space and the moment I figured it out for the most part, my space is always organized.

signature for blog post .png
 

10 things Organized People do Everyday

pexels-photo-768472.jpeg

Whether you’re an organizing enthusiast, want to get more organized or you’re interested in finding out what it takes to stay organized, incorporating new habits into your life is essential.

With that said, there a few things extremely organized people do to stay and maintain their organized life. Below are the top things you can add to your life that can make you more organized.


1. Write To-do Lists

If you don’t know already, to-do lists are so important when it comes to organizing your life. They help you keep track of your high priority tasks and the low priority tasks. They only require 5 minutes to create and best of all, you get to check them off once the task is complete – best feeling ever!

2. Write everything down

Because our brains can only remember so much, writing things down is essential when it comes to being organized. You’re able to capture what seems like, once in a lifetime aha moments. You’re able to jot down important ideas and thoughts. Plus, it helps you clear your mind of issues you are having which can help solve that problem. Most importantly, it will calm the chaos in your mind and help you have peace of mind which in turns of course aids in being organized!

3. Schedule Schedule Schedule

Well, this one goes without explaining because we all know the importance of scheduling. Scheduling is used to distinguish when you’re going to work on those things on your to-do list and it determines the amount of time that’s needed to complete them. Gone are the days you miss those important dates. The best thing about scheduling is once you’ve set a date and time, you are more likely to get through it without procrastination and/or be on time.

4. Thinking Positively

Positive thinking will help you not only be more organized but live a happier life. Try incorporating meditation for about 5-10 minutes a day or even exercise a couple times a week. I know exercising isn’t the most sought out activity to take part in but when you exercise your body releases serotonin which is associated with mental well-being (works as a natural anti-depressant).

5. Put things back into their place after you’re done using it

If you use something, putting it back in its place helps combat clutter and keeps your space get organized. Need I say more?

6. Question themselves before they buy anything

According to the LA Times, the average American owns 300,000 items. My theory is most people are either buying things because of a temporary feeling or because it’s on sale. Both are no reason why you should ever buy anything. Here are 3 questions you should ask yourself before you purchase any item (yes this includes food)!

1.    Will I use this in the next 5 days?

2.    Would I buy this if it wasn’t on sale?

3.    Will this bring value to my life?

If you ask yourself these questions, the next time you catch yourself in a buying frenzy, I guarantee you won’t end up regretting your purchase.

Keep this in mind.

The secret to keeping your space organized is owning less. Hence, the fewer items you purchase, the less clutter you will have.

7. Keep Their Space Clean

When your space is clean the more likely you are to keep it that way. Because most of us are visual, we usually navigate towards areas that are pleasing to look at – most us at least! To maintain a clean space, make sure you focus on the smaller tasks than the bigger ones, which will make the cleaning process easier. So make sure you put things back in their place, dress your bed every morning, wash them dishes or unload the darn dishwasher. Though these tasks may seem small, they will make a huge difference in the way your home feels and stays organized.

8. Have a Morning Routine

Having a morning routine let alone a routine increases your organizational skills and sets the tone for your day. Your morning routine can include getting up at 7:00 am, meditating, showering, eating breakfast all before leaving your house at 7:45 am. Sticking to your routine and making it a habit will not just keep your day organized, it will help you save none other than precious time!

9. Manage their time

Time management is a crucial part of being organized and when done correctly, you can truly reap the benefits. Using planners, calendars, to-do lists, and other time management tools will help you increase productivity therefore, grow your organizational skills. With these tools, to increase productivity and avoid distractions you must make sure that what you write down are prioritized accurately and prevent you from wasting your time on meaningless tasks. So if you’re ready to boost your time management skills, you should write down all your tasks that need to be handled that day. If this is the first day you do this, according to Brian Tracy an amazing thought leader, you will increase your productivity by a whopping 25%! To break that down in hours, you will gain back 2 extra hours in an eight-hour day just by doing this. With that extra time, you can then focus on doing something you love.

I don’t know about you but who wouldn’t want that!

10. Live in the Now

Rather than being hard on yourself because your space that was once organized is now a huge wreck and engulfed in clothes that haven’t seen a hanger for months, let it go. Thinking too hard about something that occurred in the past, tends to make that something worse. Because of that, it is crucial that you stop beating yourself up about situations, or doings that occurred yesterday and living in the present moment. Because the past is gone and the future doesn’t exist, the only moment that you have is right now. So if you find yourself in a situation where it seems like you’ve made no progress and you feel stuck, whether because you live in a cluttered space or feel you have no organizational skills because of a past experience, take a deep breath in and release. Remember the journey to being organized isn’t a perfect path. You may fall and if you do, you will get back up again. When you do, at that very moment acknowledge the feeling and enjoy it because that’s the only time you will. 

I love to know if there are any other things organized people do everyday, please let me know in the comments sections. 

Until next time!

signature for blog post .png
 

Is being Organized really for you?

desk-notebook-office-grey.jpg

So you may be thinking to yourself, of course being organized is for me. Why wouldn’t be?

Sure, you like the idea of all of your cups sitting in a nice row and your closet looking like the rainbow but is this really for you? Let me explain. I completely understand that your life is chaotic and you feel like everything that's going wrong is happening. Then the moment you consider giving up you come across some images of organized spaces on Pinterest and you think to yourself "I need to get Organized" but honestly, this may not solve the problem.

Think about it. The only reason you decided to get organized is probably because of an image you saw rather than because you really need the help.

I’m not at all saying the images we see on social media or design sites are bad because in reality, they actually act as triggers to show us what our homes can potentially look like when organized. I am guilty of doing this and I’m not ashamed of it. I just want you to acknowledge the fact that they aren’t realistic. They are just a portrayal of a space that took hours to create.

What you need to ask yourself when considering getting organized first and foremost is “Am I ready to get organized?”

Organizing your space let alone your life is a process that takes time, requires patience and understanding to achieve. It takes time because you are changing the way you think and that is something that can’t be done in a day. Depending on the amount of stuff you have in your space, it requires patience to go through and figure out what you’ll be keeping. Most importantly, you need to understand what you are getting yourself into because as many things, this is a process and in order to master a routine you have to create a habit – which can take up to 360 days. YIKES!

It may seem daunting to know that being organized can take a while and honestly it can sometimes seem like a never-ending process but once you begin to see the advantages of being organized brings into your life, it won’t seem that bad.

So let me ask you again. Is being organized really for you?

Until next time!

signature for blog post.png